Showing posts with label Theme. Show all posts

Tuesday, January 22, 2013

How to create Mega Photo gallery in Drupal 7

If you want to create mega Photo gallery in drupal 7 looks like below....

then follow some simple steps ..

1. First off all create a content type Gallery.

2. And add a image field configure it Number of value : Unlimited

3. Save it and add some content in Gallery content type.

4.  Add this line to default theme`s template.php

function bartik_process_page(&$variables) {
drupal_add_js(drupal_get_path('theme', 'bartik') . '/js/jquery.mousewheel-3.0.6.pack.js');
drupal_add_js(drupal_get_path('theme', 'bartik') . '/js/fancybox/jquery.fancybox.pack.js');
drupal_add_css(drupal_get_path('theme', 'bartik') . '/js/fancybox/jquery.fancybox.css');
$fancybox = "jQuery(document).ready(function() {
    jQuery('.fancybox').fancybox();
});";
drupal_add_js($fancybox, 'inline');
}

If this function already present in templete.php, then only add this line in between this function.


drupal_add_js(drupal_get_path('theme', 'bartik') . '/js/jquery.mousewheel-3.0.6.pack.js');
drupal_add_js(drupal_get_path('theme', 'bartik') . '/js/fancybox/jquery.fancybox.pack.js');
drupal_add_css(drupal_get_path('theme', 'bartik') . '/js/fancybox/jquery.fancybox.css');
$fancybox = "jQuery(document).ready(function() {
    jQuery('.fancybox').fancybox();
});";
drupal_add_js($fancybox, 'inline');


5. After that add custom template in template folder.Just like node--gallery.tpl.php
In this file that code are....


<div id="node-<?php print $node->nid; ?>" class="node-gallery">
<?php print render($title_prefix); ?>
  <?php if (!$page): ?>
    <h2  style="text-align:center;" <?php print $title_attributes; ?>>
      <?php print $title; ?>
    </h2>
  <?php endif; ?>
  <?php print render($title_suffix); ?>
    <?php
        $imgcount = count($node->field_image['und']);
        for ($i = 0; $i < $imgcount; $i++) {
        $image_uri = $node->field_image['und'][$i]['uri'];
            // url
            $masthead_raw = image_style_url('gallery', $image_uri);
    ?>
      <a href="<?php print file_create_url($node->field_image['und'][$i]['uri']); ?>" rel="group-<?php print $node->nid; ?>" class="fancybox">
        <img class="image<?php print ($i + 1);?>" src="<?php print $masthead_raw; ?>" />
      </a>
    <?php } ?>
</div>


6. Add a view its name gallery.


After that look my gallery its looks like...


Friday, March 30, 2012

How to use the JCarousel Module for Drupal

JCarousel is a useful module for creating Drupal slideshows. It uses the JCarousel plugin from http://sorgalla.com/jcarousel/and makes it easy to use via integration with Views.

Here's a simple example of how to use the JCarousel module.

Step 1: Install the modules


Make sure that you have these three modules installed and enabled:


Step 2: Create content with an image field


tutuploadsmedia_1328037792046.png


In order to show images, you will need content with images.

You can use the default "Article" content type if you wish. Go to Structure > Content types and make sure that you have a content type with an image field attached as in the image above. Then go to Add content and use that content type to create several content items with images attached.


Step 3: Create a view


tutuploadsmedia_1328037067831.png


Go to Structure > Views and click Add new view.

The important part of the view is "Create a block". Choose the JCarousel Display format and then click Continue & edit.

The image below shows the settings you will need. If you followed our instructions when setting up the view, the only thing you might have to change here is the Fields. Click Add and add the Content: Image field to your view.


tutuploadsmedia_1328038178103.png


Click Save to complete the creation of your view.


Step 4: Place the block


tutuploadsmedia_1328037109070.png


Go to Structure > Blocks and place your new JCarousel block somewhere on your site.

Once the block is live, it will look like the image below:


tutuploadsmedia_1328038443124.png


The JCarousel project page on Drupal.org warns:

"You will almost certainly need to do custom CSS in your theme in order to use this module. The default CSS only supports 100 pixel square items. A basic understanding of CSS is therefor required to use this module."

As you can see, the output here is 100 pixel square images.

You will need to add some CSS for JCarousel to your theme in order to change this width. The original CSS is in /sites/all/modules/jcarousel/skins/default/jcarousel-default.css

The width is being controlled by:


01..jcarousel-skin-default .jcarousel-item {

02.padding: 0;

03.width: 100px;

04.height: 100px;

05.overflow: hidden;

06.border: 1px solid #CCC;

07.list-style: none;

08.background: #fff none;

09.}


You can modify that and place it in your theme's CSS file.


How to Create Dropdown Menus in Drupal


No matter what CMS we're teaching, when we come to talking about themes and designs, one question always comes up quickly: "How do I make a dropdown menu"? Here's the answer to that question in Drupal.

First, we are going to show you how to get your menu set up correctly. Second we're going to give you three different options for showing that menu to your visitors.


Setting Up the Dropdown Menus


tutuploadsmedia_1328643949622.png


Go to Structure > Menus. Click list links next to the menu you'd like to use.


tutuploadsmedia_1328644328522.png


Click Add link and then create your link.

Pay close attention to two options further down the page:

- Enabled. Check this box.
- Parent link. If you want this link to dropdown under another, here is where you choose the top-level link. In this example below, the link will drop down from under Home.


tutuploadsmedia_1328644380136.png


When you're done, you'll see that the sub-links are indented under the top-level links.


tutuploadsmedia_1328645783324.png


If you're going to put dropdown links under existing menu links, don't forget to also open up those existing links and check the Show as expanded box.


Option 1: Using a Theme with Dropdown Menus


tutuploadsmedia_1328646997914.png


One thing that confuses some Drupal beginners is that not all themes have dropdown menus. In fact, none of the default Drupal 7 themes do so Bartik, Garland and Stark would not be the right choice in this case.

For example, the main menu bar of the default Bartik theme will always look like the image above. And if you try to place the menu in a block, you'll only get an indented link as in the image below.


tutuploadsmedia_1328645760427.png


To get an easy-to-use dropdown menu you'll need a theme such as Marinelli: http://drupal.org/project/marinelli. Each theme will be slightly different in how the dropdown menus are setup but Marinelli is a good example.


tutuploadsmedia_1328644936117.png


Install Marinelli and make it the default theme on your site.

Under the Apperance tab, click Configure next to Marinelli and scroll down. Under Primary Menu Settings, select Mega Drop Down.


tutuploadsmedia_1328645228108.png


Now when you check your site, you'll have working dropdown menus as in the image below.


tutuploadsmedia_1328645302561.png


Option 2: Use a Module


A second way to get dropdown menus on your Drupal site is to use a module. Nice Menus is very common choice and then one we'll use in this tutorial: http://drupal.org/project/nice_menus. Another very popular choice is Superfish http://drupal.org/project/superfish.


tutuploadsmedia_1328645453517.png


Install the Nice Menus module and enable it.

Go to Structure > Blocks and place one of the two Nice Menu blocks into a region of your site.


tutuploadsmedia_1328645725343.png


You can also click Configure next to one of the Nice Menu blocks and you'll be able to take some control over the menu settings.


tutuploadsmedia_1328645886530.png


Once the menu is live on your site, it will look like the image below.


tutuploadsmedia_1328645941153.png


You might not want the menu in the sidebar as in this example, so check to see which regions are available to you in current theme. Go to Structure > Blocks > Demonstrate block regions and you'll see your choices:


tutuploadsmedia_1328646054907.png


Option 3: Change the Code of Your Theme


Finally, if you have some coding knowledge, you can modify the theme that you're using to include dropdown menus.

The quickest way to do this would be to take advantage of one of the modules mentioned in Option 2 such as Nice Menus or Superfish.

Here is one step-by-step example of how you can add a Superfish dropdown menu to the Bartik theme: http://drupal.org/node/1073298.


Thursday, March 29, 2012

How to Use the Omega Base Theme for Drupal


Theming Drupal is not a straightforward task, but people are trying to make it easier. One way to do that is by creating a theme framework that provides many of the basic features that designers need: a grid system, cross-browser compatibility, base CSS classes and more..

In this tutorial, we're going to use the Omega base theme. It is the theme used by major Drupal shops such as Acquia.com and Palantir.net.

Why is Omega called a base theme? Because it never changes. You build your design on top of the base that Omega provides.

Omega remain the same whenever you use it, but you can create a sub-theme with customized block regions, column layouts and CSS. As seen in the image below, a single base theme can support multiple different variations:


tutuploadstutuploadsmedia_1322027630932.png


In this lesson we will cover

  • Installing the Omega Framework

  • Using Omega tools to create a subtheme

  • Understanding the layout

  • Basic configuration options


When you're done, you'll have everything working, and you will be ready to start designing a theme. That's going to take knowledge of CSS, and is beyond the scope of this lesson. If you don't know CSS, don't worry, you don't need to know it to get this installed and working.

This framework is still under development, so there is much more to come from the developers.


Step 1. Install some required and helper modules


There are a few modules that you will either need or will help out. Add the following modules to Drupal 7 if you haven't already.

The Omega Theme requires additional modules:

Two notes of caution:

  • Some of these modules are fairly complicated to configure and have their own learning curve to go through. If you are a beginner, you don't need to do anything with them to experiment with creating a sub-theme.

  • Some of these modules are still in early versions, so don't experiment on a live site. Use a test site to learn. Backup your live site if you're going to make changes or before you install any of these modules.


Step 2. Download and Install Omega


tutuploadstutuploadsStep_2_e7df06d8e4d1915fc2356e0acded5ce9.png


You can download the framework here: http://drupal.org/project/omega.

To install it go to Appearance > Install new theme.


tutuploadstutuploadsmedia_1322035316383.png


Browse to your local computer and click Install to upload your theme.


tutuploadstutuploadsmedia_1322034875001.png


After installation you will see two new themes available Alpha Core and Omega Core.

You do not need to enable these or set them as the default. In fact, it's better if you don't. You are going to be using these as base themes and do all your work on copies of these that you create. If you've installed all the the Omega Tools, Context and Delta you'll see an additional link on the Appearance page.


Step 3. Create the sub-theme


tutuploadstutuploadsStep_3._Create_the_sub-theme.png


Click Create new Omega subtheme.

If you're a beginner, this takes all the worry out of the process. You can create sub-themes by hand, and it's not very difficult. You don't have to use Omega as the base theme. You can use any template as the base theme. When you create the sub-theme almost all the characteristics of the base theme are inherited by the sub-theme.

It's great because when it comes time for version updates, you only have to update the base, and all the sub-themes will update with it. Any customizations you made to the sub-theme won't be affected.

The Omega subtheme creator can be used with other themes, it's not restricted to Omega. But to fully automate the process (especially for beginners) you will need to use one of the starter kits.

If you use it for other templates, there are some files you will need to create and change by hand, the starter kits won't work.


tutuploadstutuploadsmedia_1322030114830.png


Give your theme a name

Choose your base theme.

Choose your starter kit.

Omega gives you two starter kit options, Omega-html5 and Omega-xhtml. HTML5 is a better choice in terms of long-term compatibility with the modern web’s changing browser standards. Choose Omega-xhtml starter kit if you have any particular XHTML requirements.


Step 4. Go through the configuration wizard


tutuploadstutuploadsStep_4._Go_through_the_configuration_wizard.png


Only step one of the wizard is working as this is written. So you can jump to Finish after you give it a name, description and version number.


tutuploadstutuploadsmedia_1322030300883.png


Step 5. Finalize the configuration


tutuploadstutuploadsStep_5._Finalize_the_configuration..png


Check the box to Enable the theme.


tutuploadstutuploadsmedia_1322030390416.png


After you click Enabled, you get to choose whether you want this as the default theme. You can also click Advanced configuration to open up more options. If you are a beginner they won't mean too much, and defaults will work for learning purposes.


tutuploadstutuploadsmedia_1322030452103.png


When you return to the Appearance page you will see that the theme with the name you gave it is now the default theme.


Step 6. Visit the site


tutuploadstutuploadsStep_6._Visit_the_site.png


This is what you will see when you take a look at the site.

The pink bars are the columns created by the grid system. The boxes are the block regions. You can easily see how the regions are arranged and how many standard columns they span.


tutuploadstutuploadsPr.png


On the top right of the screen you will see two green check marks. When you mouse over them they open and tell you what they relate to. If you click GRID, the check mark will change to a red x and the pink bars will disappear. When you click on BLOCKS, you toggle the outlines of the regions.

The third one is the result of adding the CSS Live Module. When you click it it opens a side pane that you're going to like a lot.


tutuploadstutuploadsmedia_1322030653979.png


The side pane will give you access to all of your CSS files and and editor window. You can make changes while you are viewing the site. The basic site is so plain you're free to do just about anything you want with the CSS.

Caution, these are permanent changes you are making in the edit pane. Make sure you have backups of your CSS files in case you change your mind about something. They will not change the base theme CSS, only on the sub-theme.


tutuploadstutuploadsThe_side_pane_wil.png


Here's what the site looks like when the grid and the block regions are toggled to "off".


Step 7. Configure the sub-theme you created


tutuploadstutuploadsStep_7._Configure_the_sub-theme_you_created._1.png


Click the Settings link next to the theme logo on the Appearance page.

You can ignore the Edit link. It takes you to the uncompleted wizard we didn't get to use during installation. Here's what the authors say about it though, "Omega UI - IN DEVELOPMENT - Will provide an advanced jQuery interface for configuring Omega theme settings via drag & drop interface chocked full of awesomesauce!"


tutuploadstutuploadsStep_7._Configure_the_sub-theme_you_created..png


Choose your grid system.

Your choices are the default and fluid. If you choose fluid, you will no longer have any fixed columns, and the layout will expand to 100% of the screen.

The responsive settings will be checked by default.


tutuploadstutuploadsmedia_1322031567023.png


This will help bring your site to the small screen. These settings will work for now.


tutuploadstutuploadsmedia_1322031593397.png


For now it's best to just keep the Normal layout as primary. You can try the other settings, and see what happens, but this doesn't need to be dealt with unless you unchecked the "responsive grid" box at the top of the page.


Step 8. Zone and region configuration


tutuploadstutuploadsStep_8._Zone_and_region_configuration.png


The settings allow you to modify the regions, without needing to modify the template files. Each panel here corresponds to the section rows and the regions that show up on the home page. VIew your site or take another look at the picture in Step 6, and you'll see that this list corresponds to your layout.

They kind of mix up some terminology here. The link says zones and regions, but the panels are titled section and zone. A section is an area of the layout that goes across the entire grid. A zone is a part of the section. When you click on the zone, you'll see the region that is in the zone. These would be the same as "block regions" in other templates, and will be the place you put the blocks.

This is very confusing. I eventually had to start putting content in and assigning the blocks to regions to see what was really happening.

Here's what you need to start giving these regions or zones, or whatever they decide to call them, some shape.


tutuploadstutuploadsmedia_1322041343245.png


Click User Zone to open the editing a pane.

Click Configuration to edit the configuration.

Click Regions to open the pane showing the regions.

Click the name of the region you want to edit.

In the first pane, providing a wrapper allows you to use custom CSS. Force this zone to be rendered - This means that the space will be rendered even if the zone is empty. Usually if it's empty it collapses and doesn't show at all.

User Bar First is a region like other regions in other templates, and this is where you will be placing your blocks. This pane allows you to place the region exactly and control it's size. If you prefix it with 2 columns, the first two columns on that row will be blank, and nothing else will be able to fill them. If you suffixed it with 2 columns, nothing will be able to fill the last two columns, and your region will occupy the 8 columns in the middle, and it will be centered.

If you wanted this region to occupy the last 8 columns, you would prefix it with 4 columns, and suffix it with 0 columns. This is how you get exact placement of regions on your layout.


Step 9. Toggle your CSS


tutuploadstutuploadsStep_9._Toggle_your_CSS.png


You can have many style sheets. As you create new versions of a theme, you can turn some on and turn some off. You control it with the check boxes.


tutuploadstutuploadsmedia_1322031870742.png


The other sections I didn't cover are either fairly simple or not really necessary for getting started learning how to work with Omega.

The purpose of this tutorial is to give you enough information so you can install the theme, install the sub-theme and get the basic configuration set up so you can start working on your next incredible design for the Omega Framework.

The next step for students is to start studying the CSS files and start using the code panel to make some customizations. That's where the fun begins. Review our coding course online and get started!


Monday, February 27, 2012

Theme: Which are the files in a typical drupal theme and their purpose

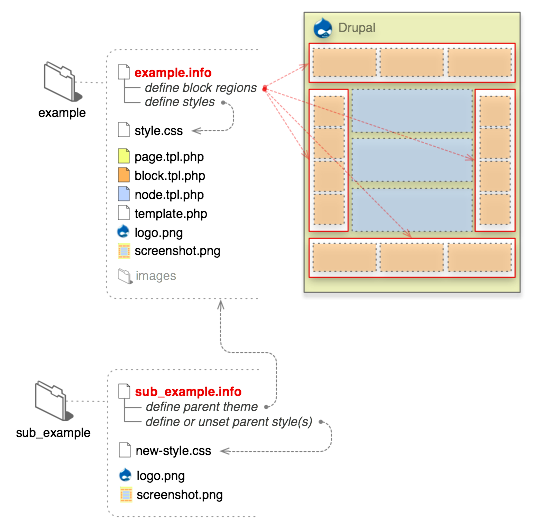
A drupal theme is a collection of files that define the presentation layer. You can also create one or more "sub-themes" or variations on a drupal theme. Only the .info file is required, but most themes and sub-themes will use other files as well. The following diagram illustrates the files that are found in a typical drupal theme and sub-theme.

DRUPAL 6


DRUPAL 7

theming requirements

.info (required)
All that is required for Drupal to see your theme is a ".info" file. Should the theme require them, meta data, style sheets, JavaScripts, block regions and more can be defined here. Everything else is optional in drupal theme.

The internal name of the theme is also derived from this file. For example, if it is named "drop.info", then Drupal will see the name of the theme as "drop". Drupal 5 and below used the name of the enclosing folder of the theme.

Info files for themes are new in Drupal 6. In version 5, .info files were used solely for drupal modules.

template files (.tpl.php)
These drupal templates are used for the (x)HTML markup and PHP variables. In some situations they may output other types of data --xml rss for example. Each .tpl.php file handles the output of a specific themable chunk of data, and in some situations it can handle multiple .tpl.php files through suggestions. They are optional, and if none exists in your drupal theme it will fall back to the default output. Refrain from having complex logic in these files. In most cases, it should be straight (x)HTML tags and PHP variables. A handful of these templates exist in directories where core and contributed modules exist. Copying them to your drupal theme folder will force Drupal to read your version.

Note: The theme registry caches information about the available theming data. You must reset it when adding or removing template files or theme functions from your theme.

template.php
For all the conditional logic and data processing of the output, there is the template.php file. It is not required, but to keep the .tpl.php files tidy it can be used to hold preprocessors for generating variables before they are merged with the markup inside .tpl.php files. Custom functions, overriding theme functions or any other customization of the raw output should also be done here. This file must start with a PHP opening tag "

Sub-themes
On the surface, sub-themes behave just like any other drupal theme. The only differences is that they inherit the resources from their parent themes. To create one, a "base theme" entry inside the .info file is needed. From there it will inherit the resources from its parent theme. There can be multiple levels of inheritance; i.e., a sub-theme can declare another sub-theme as its base. There are no hard set limits to this.

Drupal 5 and below required sub-themes to be in sub-directories of the parent theme. This is no longer the case.

Others


  • The logo and screen shot is not absolutely necessary for the theme to function, but it is recommended, especially if you are contributing your theme to the Drupal repository. Screenshots will show inside the theme administration page and the user account settings for selecting themes when the appropriate permissions are set. See the screenshot guidelines for more information.

  • To supply administrative UI settings or "features" beyond logo, search, mission, etc., a "theme-settings.php" file can be used. This is an advanced feature. More information can be found in the Advanced settings handbook page.

  • For color module support, a "color" directory with a "color.inc" file is needed along with various support files.


  • If you want to base your work on a core theme, use sub-theming or make a copy and rename the theme. Directly modifying Bartik, Garland or Minnelli is strongly discouraged, since they are used for the install and upgrade process.

  • All non-Core or modifications to Core themes should be installed under the "sites/all/themes" directory to keep them separate from core files. If you plan to run multiple sites from a single Drupal code base, you can make a theme available to a specific site rather than all sites; read about how to set this up in Multi-site installations.