Tuesday, January 29, 2013

How to autopost content from my site to facebook

How to autopost content from any site to facebook page.
first of all do these steps.....

1. Create a facebook page. i.e-facebook.com/abc.

2. After that create a apps in facebook which post our node to facebook page. www.developer.facebook.com. And create an apps. ie:- test and configure it looks like that...


3. After that we also configure it


4. Then save it.

5. Install fbautopost module and enable it. Install from http://drupal.org/project/fb_autopost
and configure it goto-mysite.com/admin/structure/fb
and goto stream post tab and create  Facebook's Graph Explorer token and fill text box save it.

6. And create content any and enable post on facebook and give its page name and save it. That post it on facebook page .if no any mistake.

After that enjoy it.

Tuesday, January 22, 2013

How to create Mega Photo gallery in Drupal 7

If you want to create mega Photo gallery in drupal 7 looks like below....

then follow some simple steps ..

1. First off all create a content type Gallery.

2. And add a image field configure it Number of value : Unlimited

3. Save it and add some content in Gallery content type.

4.  Add this line to default theme`s template.php

function bartik_process_page(&$variables) {
drupal_add_js(drupal_get_path('theme', 'bartik') . '/js/jquery.mousewheel-3.0.6.pack.js');
drupal_add_js(drupal_get_path('theme', 'bartik') . '/js/fancybox/jquery.fancybox.pack.js');
drupal_add_css(drupal_get_path('theme', 'bartik') . '/js/fancybox/jquery.fancybox.css');
$fancybox = "jQuery(document).ready(function() {
    jQuery('.fancybox').fancybox();
});";
drupal_add_js($fancybox, 'inline');
}

If this function already present in templete.php, then only add this line in between this function.


drupal_add_js(drupal_get_path('theme', 'bartik') . '/js/jquery.mousewheel-3.0.6.pack.js');
drupal_add_js(drupal_get_path('theme', 'bartik') . '/js/fancybox/jquery.fancybox.pack.js');
drupal_add_css(drupal_get_path('theme', 'bartik') . '/js/fancybox/jquery.fancybox.css');
$fancybox = "jQuery(document).ready(function() {
    jQuery('.fancybox').fancybox();
});";
drupal_add_js($fancybox, 'inline');


5. After that add custom template in template folder.Just like node--gallery.tpl.php
In this file that code are....


<div id="node-<?php print $node->nid; ?>" class="node-gallery">
<?php print render($title_prefix); ?>
  <?php if (!$page): ?>
    <h2  style="text-align:center;" <?php print $title_attributes; ?>>
      <?php print $title; ?>
    </h2>
  <?php endif; ?>
  <?php print render($title_suffix); ?>
    <?php
        $imgcount = count($node->field_image['und']);
        for ($i = 0; $i < $imgcount; $i++) {
        $image_uri = $node->field_image['und'][$i]['uri'];
            // url
            $masthead_raw = image_style_url('gallery', $image_uri);
    ?>
      <a href="<?php print file_create_url($node->field_image['und'][$i]['uri']); ?>" rel="group-<?php print $node->nid; ?>" class="fancybox">
        <img class="image<?php print ($i + 1);?>" src="<?php print $masthead_raw; ?>" />
      </a>
    <?php } ?>
</div>


6. Add a view its name gallery.


After that look my gallery its looks like...


Sunday, January 20, 2013

Database Data Fetching using Db_query Codee

<?php 
global $user; 
$userid=$user->uid; 

$result = db_query('SELECT n.mett_score FROM {training_score} n WHERE n.uid = :uid', array(':uid' => $userid)); 

foreach ($result as $record) { 
echo 'Your Score is:'; print_r($record->mett_score); 
// or Aply This Code  
echo '<br/>' .'You Score Is:' .$record->mett_score; 
} 
?>

Monday, July 16, 2012

Installing Drupal on Windows with PostGRESQL DB

The Downloads:

The system requirements for Drupal are given here. In short, download Apache, PHP (download BOTH the installer and the zip version), Post GRE SQL.

The Configuration:

The step-by-step instruction to install Drupal is given here and it's fairly intuitive.

The Gotchas:

There were a couple of things to watch out for:

1. PHP looks for the config file (php.ini) in C:\Windows (or the equivalent windows folder) by default and that file isn't automagically created. So we need to add the PHP installation folder path to the PATH variable. In my case, I added C:\Program Files (x86)\PHP to the PATH variable.

2. Drupal uses PDO (PHP Data Objects) to connect to a database and you should be having a PDO (which is usually a DLL) for each DB you intend to support. However, this DLL is not provided in the PHP installer; and even if you go around hunting for that DLL file in Google, you will hit nothing but road blocks. So after you install PHP using the installer, unzip the contents of the PHP zip version that you downloaded (to a different folder of course) and copy the php_pdo_pgsql.dll file from the ext folder (under the extracted PHP folder) to the actual ext folder (created by the windows installer). Then, the php.ini file needs to be updated to include the following lines:
[PHP_PDO_PGSQL]
extension=php_pdo_pgsql.dll

Once this is done and the apache server is (re)started, following the step-by-step Drupal installation instructions should do the magic.

Thursday, July 12, 2012

Drupal feature Module example

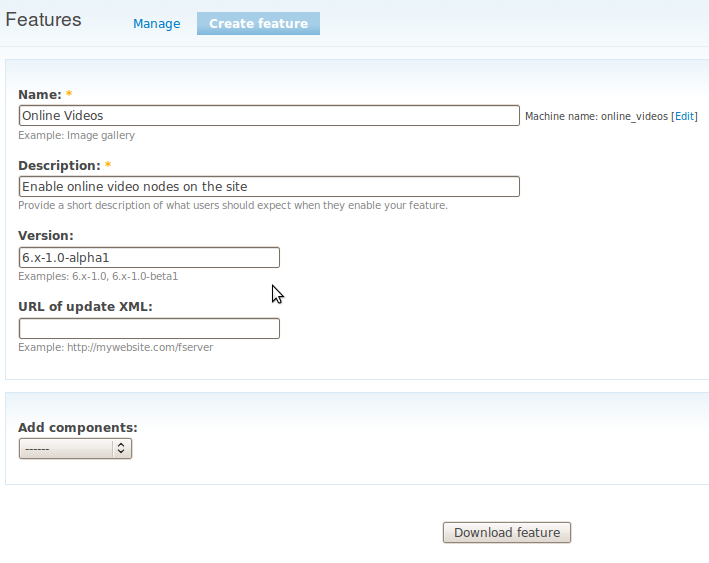
In this example we create an Online Videos feature. The site builder configured a lot in preparation of this feature we are currently not interested in.

Step 1. admin/build/features/export


As you can see we added a name, description and a version. Next step will be defining what this feature provides.

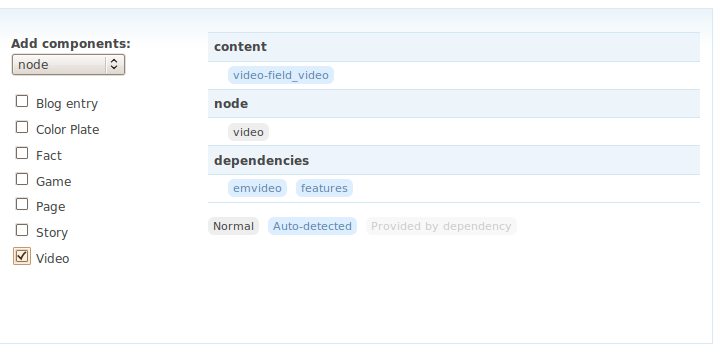
Step 2. Select features components.

From the "Add Components" dropdown we have to select the components the feature consists off. This is about a video node so we select "Node". From the checklist we only need the video node type.


The auto-detect functionality grabs the required building blocks node (video), content (video-field_video), modules (emvideo, features). Therefore, when we want to install the feature, we need to make sure we have installed the required modules.

Step 3. Download the feature.

When satisfied with all components, click the download button and save the tarball (in this case, online_videos-6.x-1.0-alpha1.tar.gz).

Step 4. Install and enable the feature.

Best thing to do is untar the file in your current project. As described above, features are not listed on the site/build/modules page even though they are technically modules. To keep them separate, you should consider putting all of your features in a separate directory — e.g., site/all/modules/custom/your-feature.


The feature now appears at admin/build/features. Checking the box next to the feature's name and saving page causes the features module to check for the current state all features.

Step 5. Visit admin/build/modules

When checking for the module online video module it's not there. Searching for the name would show you a dependency on online_video module. To disable such a module you have to disable the feature first.

Notes

  • We have said nothing about what drupal projects you need to install to be able to install our example feature.
  • If we had created a view this would be exported too. test it yourself.

Tuesday, June 19, 2012

Deploying local to remote sites drush site aliases


Deploying local to remote sites drush site aliases by kiwipion

Introduction

In this tutorial we are going to deploy a copy of our current local site across to what we will term our staging server using the Drush function site aliases. For ease of use the staging server will be on the local machine as well, but you can use the same principal for propagating across to a remote server such as a shared host.

Prerequisites

For you to follow these instructions you will need the followng setup on your machine

  • Local environment set up ie MAMP for mac
  • Drush installed.

Preparation

Implement your own aliases.drushrc.php file. You can copy the example.aliases.drushrc.php from the examples directory to either your local drush root directory or into your drupal installation make sure you read the instructions at the top of this file to ensure that it gets picked up buy drush.

There are two very good articles that can be used as reference here http://emspace.com.au/article/drush-aliases-primer-live-dev-syncing & here http://drupal.org/node/670460

Go into your drush/examples folder and copy the examples.aliases.drushrc.php to a location of your preference, I'll be putting mine in the drupal installation directory and renaming it to mysite.aliases.drushrc.php.

For reference here are my aliases for @mysite.dev & @mysite.stage

$aliases['dev'] = array(     'uri' => 'myserver.myserver',     'root' => '/sites/mysite',     'path-aliases' => array(       '%drush' => '/Users/nigelhenshaw/dev/drush',       '%drush-script' => '/Users/nigelhenshaw/dev/drush/drush',       '%dump-dir' => '/sites/SQL/dumps/',       '%dump' => '/sites/SQL/sql-dev.sql',       '%files' => 'sites/drupalovereasy.com/files',      ),   );   $aliases['stage'] = array(     'uri' => 'myserver.stage',     'root' => '/sites/mysite.stage',     'path-aliases' => array(       '%drush' => '/Users/nigelhenshaw/dev/drush',       '%drush-script' => '/Users/nigelhenshaw/dev/drush/drush',       '%dump-dir' => '/sites/SQL/dumps/',       '%dump' => '/sites/SQL/sql-stage.sql',       '%files' => 'sites/drupalovereasy.com/files',      ),   );

Inform the drushrc.php file of the location of the aliases file in ['alias-path'] section.

Now check that drupal is scanning your alias file correctly and your configuration is correct by running

drush sa

You should be something like this, which will confirm that drush is scanning your alias file and the context of your alias is correct.

@self @mysite.dev @mysite default

The alias I definned is @mysite.dev

Let's see if we can backup the contents of the database by doing a drush dump, this will be the command that I will be running

drush @mysite.dev sql-dump > `drush dd @mysite.dev:%dump`

A copy of my database should now be downloaded at /sites/SQL/dumps/, which was specified in the the mysite.aliases.drushrc.php

Now I'm going to repeat the process and create alias settings for my staging server which I will call mysite.stage

Deploy

There are two steps required for migrating across to a new site location that has not yet been populated

1/ Rsync the code across

% drush rsync @mysite.dev @mysite.stage

2 / Configure the database and ensure that settings.php is aligned with it.

3/ Sql-sync the database across

% drush sql-sync @mysite.dev @mysite.stage 

Your staging site should now be up and running.

Synchronization

Once a remote site has been installed you will have to consider how you will maintain the site after ie how do you manage source code and database content. Normally source is pushed up to the remote server and database content is pulled down. An example demonstrating this would be upgrading a site where that database content has been pulled down to the staging server using drush sql-sync. The source code is then pushed up to the staging server from the local dev server using drush rsync, then staging server is tested and verified. Once passed the validation criterea the remote live site will then be put into maintenance mode with the latest copy of the database sync'd back down to the staging server. The validation testing would normally be re-run and then the source code would be merged up to the live server.

This is a very light-weight example which I'm using the demonstrate the direction of source code versus database data in relation to each other, which is different from what we did with the brand new setup of the staging server that had both the source code and database content pushed to the staging server.

Final Thoughts

In closing it will be interesting to see how drush rsync and sql-sync will develop in regards with the work happening in git and dog, I have seen discussions of installing git on the live server and merging the code up but I don't yet know if it is possible to install git on a shared host without the root access. And I do find the drush rsync & sql-sync fast and simple to use.

And my final word for the day "always make sure you backup the database before running the sql-sync command".

Sunday, June 10, 2012

MySql replication on same Windows machine

1. First install mysql-5.5.11-win32.msi on windows machine. While installing choose custom installation and change
installation path to D:\MySQL\MySQL Server 5.5
2. Use all the default parameter like Service name is MYSQL and port number is 3306 and setup bin path.
3. And also modify root password to mysql.
3. Now check whether your installation is correct or not.
4.Open dos prompt and type below command.
c:\> mysql -uroot -pmysql -hlocalhost -P3306;

If you get mysql command then everything is ok.
We will treat mysql 5.5 is MASTER.
Now create one database:

mysql> create database santosh;

5. Now install another version of mysql (mysql-5.1.56-win32.msi) for SLAVE. Again while installing choose custome
installation and change installation path to D:\MySQL\MySQL Server 5.1
6. Change service name to MYSQL2 and port number to 3307
7. Modify root password to root.
8.Now check whether your installation is correct or not.
9.Open new dos prompot and type below command.

c:\> mysql -uroot -proot -hlocalhost -P3307;

If you get mysql command then everything is ok.
We will treat mysql 5.1 is SLAVE.
Now create one database:
mysql> create database santosh;

Up to here two mysql instance are running in your windows machine.

Now start the replication implementation.

1. Open D:\MySQL\MySQL Server 5.5\my.ini then add four options to the [mysqld] section of the my.ini file

[mysqld]
log-bin=dellxp1-bin.log
server-id=1
innodb_flush_log_at_trx_commit=1
sync_binlog=1

save it.
Restart the MYSQL service from your pc. MyComputer -> Right click -> click on Manage -> Services and Application -> Services ->
search MYSQL on right side, right click on that MYSQL and click on restart.

The next step in setting up replication is creating an account that will be used exclusively for replication. We strongly advise creating a dedicated replication user be created for better security so you won’t need to grant any additional privileges besides replication permissions. Create an account on the master server that the slave server can use to connect. As mentioned, this account must be given the REPLICATION SLAVE privilege.

Open one dos windows for all MASTER operation.
c:\>mysql -uroot -pmysql -hlocalhost -P3306;
mysql> create user ‘replication_user’ identified by ‘password’;
mysql> grant replication slave on *.* to ‘replication_user’@'%’ identified by ‘password’;
mysql> flush privileges;
mysql> FLUSH TABLES WITH READ LOCK;
mysql> SHOW MASTER STATUS;

+——————–+———-+————–+——————+
| File | Position | Binlog_Do_DB | Binlog_Ignore_DB |
+——————–+———-+————–+——————+
| dellxp1-bin.000001 | 338 | | |
+——————–+———-+————–+——————+
1 row in set (0.00 sec)

Please note down this file name and position, it will use to later.

Now take your backup of your MASTER database as we have new database so this below step are not required. But when you have to create SLAVE of running database then it step must be required, so lets go these below step too.

Open new dos prompt.

Taking backup from MASTER:
C:\>mysqldump -uroot -pmysql -hlocalhost -P3306 santosh> d:\test2.sql

Now export this back to SLAVE, run below command on same dos windows.
C:\Users\sumankbi>mysql -uroot -proot -hlocalhost -P3307 santosh< d:\test2.sql

Now some change on SLAVE side:
1. Open D:\MySQL\MySQL Server 5.1\my.ini then add four options to the [mysqld] section of the my.ini file

[mysqld]
server-id=2

save it.
Restart the MYSQL2 service from your pc. MyComputer -> Right click -> click on Manage -> Services and Application -> Services ->
search MYSQL on right side, right click on that MYSQL2 and click on restart.

Open one dos windows for all SLAVE operation.
c:\>mysql -uroot -proot -hlocalhost -P3307;

mysql> stop slave;
mysql> CHANGE MASTER TO
MASTER_HOST=’localhost’,
MASTER_USER=’replication_user’,
MASTER_PASSWORD=’password’,
MASTER_PORT=3306,
MASTER_LOG_FILE=’dellxp1-bin.000001′,
MASTER_LOG_POS=338;

mysql> show slave status\G;
Output will come huge, among two line should be like:
Slave_IO_Running: No
Slave_SQL_Running: No

Because slave is stopped now.
Now time came to start slave.
on slave side:

mysql> start slave;
Now check slave status:
mysql> show slave status\G;
Output will come huge, among two line should be like:
Slave_IO_Running: Yes
Slave_SQL_Running: Yes

If both values are Yes, then everything are ok.

Now you can check your replication work.

Create some table in MASTER santosh database or any database (those should be there at SLAVE side) then check at slave side.

Now you stop slave again then you change of MASTER will not come but once again you will start slave then slave will get automatically updated from last time stopped pointer.

More details on http://dev.mysql.com/doc/refman/5.0/en/replication.html

Thanks:

Santosh