Monday, February 27, 2012

Search engine-friendly site migration

When migrating a website from any system to Drupal you should be aware of existing inbound links to your site, as well as search engine indexes and ranking. In order to maintain your search engine ranking and also not break inbound links you should plan to redirect inbound requests to old uris to your new drupal nodes.

Instead of offering up 404 Errors, you can direct users to the content they are looking for. In some cases using the path_redirect module may be sufficient. In other cases you may want to write redirect rules in your .htaccess file, and in still other cases, the method described below may work for you. Another step, which will help with search engine indexing is to install and configure xmlsitemap module and submit your sitemap to the major search engines for indexing.

The rest of this article describes an approach that will parse he Search Engine query from the HTTP_REFERER and search the drupal website for what the user was actually looking for.

Create a page node with PHP code enabled in the input format, and add the following code.
<?php
$searchengines = array(
'^http://www\.google.*$' => 'q',
'^http://www.googel.fi.*$' => 'q',
'^http://.*search.msn.co.*results.*$' => 'q',
'^http://.*\.mysearch.com/jsp/GGmain.jsp?searchfor=.*$' => 'searchfor',
'^http://search.freeserve.com/.*$' => 'q',
'^http://aolsearch.aol.co.*$' => 'query',
'^http://search.yahoo.com.*$' => 'va',
'^http://search.yahoo.com.*$' => 'p',
'^http://www.bbc.co.uk/cgi-bin/search/.*' => 'q',
'^http://www.tiscali.co.uk/search/results.php.*$' => 'query',
'^http://www.altavista.com/web/results.*$' => 'q',
'^http://search.hotbot.co.uk/cgi-bin/pursuit.*$' => 'query',
'^http://www.excite.co.uk/search/web/results.*$' => 'q',
'^http://uk.search.yahoo.com/search.*$' => 'p',
'^http://search.wanadoo.*$' => 'q'
);
$referer = getenv("HTTP_REFERER");

while( list( $regexp, $qsitem ) = each( $searchengines ) )
{
if( eregi( $regexp, $referer ) )
{
echo( t("<br/><h2>Search Engine Detected</h2>It would appear you arrived here on the wings of a search engine, so, I will search my local database and show you anything that matches what you were looking for:<br/>"));
$url = parse_url( $referer );
$querystring = $url['query'];
$querystring = explode( "&", $querystring );
while( list( , $value ) = each( $querystring ) )
{
$item = explode( "=", $value );
if( $item[0] == $qsitem )
{
if( trim( $item[1] ) != '' )
{
$item[1] = urldecode( $item[1] );
echo ( search_data( $item[1] ) );
}
}
}
}
}
?>


This provides a (partial) list of regular expressions for common search engines, with information as to which query string parameter is the query the user entered. The HTTP_REFERER value (the site the user clicked a link to get to your site) is then examined against this list. When a match is found, a search is done using the standard Drupal search call (search_data). This locates potential matches, and hopefully, keeps the user on your site.

In order to use this, create a new node which allows PHP code. You can call it what you want, and put whatever explanatory text you like on it. You can set whatever path you like. Just drop the above code-clip into place. Then, in Administration -> Settings set the 404 handler to be the path to the new node you created, and voila, if the user arrives from a recognized search engine, their search is performed on your site. It's working nicely for me.

Migrating to Drupal

This page contains hints and scripts from members of the Drupal community for migrating to Drupal from other content management systems (CMS) weblog, and bulletin board applications. Migrating from other platforms often requires knowledge of PHP and SQL.

Migration involves mapping data fields from the original application's database into Drupal's database. For some applications this can be a simple task, with tools or scripts available to do the migration. Other applications may have complex database schemas, lack documentation, and are uncommon enough that there are no tools available.

The best way to find out if tools or scripts exist for your application is to search on Google. For example a search such as "migrate WordPress Drupal" returns dozens of useful links.

If there are no tools available for migrating from your application to Drupal, you will want to familiarize yourself with Drupal's database schema, as well as the schema of the application you are migrating.

You will need to map all your current users into Drupal's users table. If you have different roles (for example, read-only, author, editor/reviewer, admin), you will need to assign your users to properly set up and configured roles in Drupal. This can mostly be done through Drupal's admin interface, although if you have a large number of users, you may want to find a way to automate the assignment. Editing each user by hand could be time consuming.

If the content being migrated is text, it would likely map into the node and node_revisions tables, with comments in the comments table.

It is usually possible to import databases (MySQL, etc.) containing content and users from your previous CMS into Drupal.

This can be done by exporting the databases first to CSV (comma-separated values) or similar files. Tools such as phpMyAdmin for MySQL can make this task easier. You can then import these files with import/export modules such as Import HTMLFeedsMigrateNode ImportUser ImportCSV Parser, or Transformations (see a module comparison).

Note that content is often imported as Content Construction Kit (CCK) custom content types. If your tables are available in your Drupal database, you can use the Table Wizard to expose them to Views, and then use the Migrate module to copy the data from the old columns to the CCK content types. Also, the Node Convert module can convert imported node types to other node types; it supports, at least, CCK fields, book and forum nodes, and probably others like blog, etc.

In the case that your chosen import module is not yet ready for the Drupal version you wish to use, then there is the workaround of installing a site running on a previous Drupal version just for the import, and then upgrading it.

On the other hand, if you prefer to migrate data into Drupal developing a custom PHP script, see for example Migration tips for some techniques.

Support for migrating can be found on the Drupal.org forum, Converting to Drupal. See also the Drupal group Content migration, import, and export, for discussion of best practices in content migration. Drupal Groups also has a comparison of modules for importing and exporting data.

The following pages describe methods people have used to migrate to Drupal in the past. As other CMS software and Drupal evolve, you can use these as a guide to help with your own.

Drush Windows Installer


The Drush Windows Installer provides a convenient way to install Drush and the components it needs in order to run on Microsoft Windows. You may download it from the attachments list at the bottom of this page. Please see the installation guide below for instructions on how to run the installer.

Supported Operating Systems


  • Windows 7

  • Windows Vista SP2

  • Windows XP SP3+

  • Windows Server 2003 SP2+

  • Windows Server 2008

  • Windows Server 2008 R2


Supported Shells


  • minsw / msysgit (Recommended)

  • DOS

  • PowerShell


Cygwin is untested, but probably works.

MsysGit


MsysGit is not installed by the Drush Windows Installer. Its use is optional, but recommended. MsysGit provides access to the tools git and patch, which are very useful when participating in the Drupal community at drupal.org. The "Full installer for official Git", version 1.74 or later is recommended.

Limitations


  • SqlServer: Most drush sql commands work with SqlServer, mysqldump being one notable exception.

  • sql-sync: Windows-to-Windows sql-syncs do not work. Local sql-syncs may work. Remote sql-syncs from Windows to Linux may work under msysgit. Needs more work and testing.


For more details on open Winodws issues, see the windows issues in the drush issue queue.

License


The Drush Windows Installer installs Drush, which is licensed under the GPL v2. It also installs and uses other components available under other open-source licenses; see the license file for information on the licenses used by the non-Drush components.

Support


Drush Windows Installer maintainer: Martin Kulov
Please report any issues with Drush or the Drush Windows installer in the Drush Issue Queue; please set the component appropriately (e.g. use "Windows Installer" for installation issues).


Run multiple sites from the same code base (multi-site)

If you are running more than one Drupal site, you can simplify management and upgrading of your sites by using the multi-site feature. Multi-site allows you to share a single Drupal installation (including core code, contributed modules, and themes) among several sites.

This is particularly useful for managing the code since each upgrade only needs to be done once. Each site will have its own database and its own configuration settings, so each site will have its own content, settings, enabled modules, and enabled theme. However, the sites are sharing a code base and web document root, so there may be security concerns (see section below for more information).

Overview of the Process


To create a new site using a shared Drupal code base you must complete the following steps:

  1. Create a new database for the site.

  2. Create a new subdirectory of the 'sites' directory with the name of your new site (see below for information on how to name the subdirectory).

  3. Copy the file sites/default/default.settings.php into the subdirectory you created in the previous step. Rename the new file to settings.php.

  4. Adjust the permissions of the new site directory, and grant write permissions on the configuration file

  5. Make symbolic links if you are using a subdirectory such as example.com/subdir and not a subdomain such as subd.example.com (see the subdirectory multi-site section below for details).

  6. In a Web browser, navigate to the URL of the new site and continue with the standard Drupal installation procedure.


It may also be necessary to modify your Web server's configuration file (often named httpd.conf for Apache) to allow Drupal to override Apache's settings. This is true for all installations of Drupal and is not specific to the multi-site install. Additional information is available in the Best Practices: Configuring Apache and PHP for Drupal in a Shared Environment section of the Install Guide.

Details of the Process


Domains, URLs, and sites subdirectory name


The new subdirectory of the sites directory has a name that is constructed from the site's URL. For example, the configuration for www.example.com would be in sites/example.com/settings.php. You do not need to include 'www' as part of the directory name.

Drupal will use the same sites/example.com directory for any subdomain of example.com, including www, unless there is an alternative, matching subdomain sites subdirectory. For instance, URL http://sub.example.com would be served from sites/sub.example.com, if it exists.

For a subdirectory URL, such as http://example.com/subdir, name the sites subdirectory as follows: sites/example.com.subdir -- and read the section below on getting subdirectory multi-site working.

If you are installing on a non-standard port, the port number is treated as the first part of the subdomain. For example, http://www.example.com:8080 could be loaded from sites/8080.example.com. If that directory doesn't exist, Drupal would then look for sites/example.com, just like a real subdomain.

Site-specific modules and themes


Each site configuration can have its own site-specific modules and themes in addition to those installed in the standard 'modules' and 'themes' directories. To use site-specific modules or themes, simply create a 'modules' or 'themes' directory within the site configuration directory. For example, if sub.example.com has a custom theme and a custom module that should not be accessible to other sites, the setup would look like this:
sites/sub.example.com/settings.php 
sites/sub.example.com/themes/custom_theme
sites/sub.example.com/modules/custom_module

Document root


One area of frequent confusion is that in a Drupal multisite installation the webserver document root is the same for all sites. For example with the following three sites: example.com, sub.example.com and example.com/site3 there will be a single Drupal directory and all sites will be calling the same index.php file.

Some webhosts automatically create a new directory (i.e. example.com) when creating a new domain or subdomain. In this case it is necessary to make it into a symbolic link to the main Drupal directory, or better yet when creating the domain or subdomain, set it to use the same document root as the site where you have Drupal installed.

Subdirectory multi-site


If you are attempting to get Drupal multi-site working using subdirectory URLs rather than subdomain or different domain URLs, you may encounter problems. You'll start out by making a directory such as sites/example.com.subdir, and putting a settings.php file there. If this works for you, great! But it probably will not, until you make a symbolic link that tells your web server that the document root for http://example.com/subdir is the same as the document root for http://example.com. To do this, go to the example.com document root and type:
ln -s . subdir

(substituting the actual name of the subdirectory you want to make work).


If your codebase itself is in a subdirectory, then link your new site to the directory:
ln -s drupaldir subdir


This symbolic link is enough to resolve issues with subdirectory multi-site installations on at least some web hosts. If you still encounter problems with clean URLs and have access to edit the .htaccess file, try adding the following stanza immediately before the existing rewrite rule (for Drupal 7):

 
RewriteCond %{REQUEST_FILENAME} !-f
RewriteCond %{REQUEST_FILENAME} !-d
RewriteCond %{REQUEST_URI} !=/favicon.ico
RewriteCond %{REQUEST_URI} ^/subdir
RewriteRule ^ subdir/index.php [L]


That block should go right after the RewriteBase / line, and before the other RewriteCond lines. What that does is catch incoming URLs that contain the subdir prefix and route them to the symlinked file so that they find the right database. Note that if you have multiple subdirectory-based multi-sites, each one will need its own block as above. (Based on this forum thread: http://drupal.org/node/239583#comment-786932)

Note that these problems do not usually occur for multi-site installations using a subdomain, so you might want to try that if you cannot get subdirectory multi-site to work. (However, subdomains are not good for search engine rankings!)

Localhost alias for local workstation


On many systems it is possible to create entries in a "hosts" file to create aliases for the localhost name for a local workstation. By creating aliases for localhost it is possible to create names such as localdev1.example.com and localdev2.example.com, both for the local computer.

If on the other hand you use subdirectories in your local web root, create a symbolic link like this:
ln -s drupaldir subdir

and name your site folder localhost.subdir.


Domain name changes


Once a site is in production in a particular subdirectory under the sites directory, the subdirectory should not be renamed, even if the Web site URL changes. This is because several database tables (for example: system and files) include references to "sites/www.mydomain.com." Instead of renaming the sites directory, you can create a symlink to the new URL from the old one. Navigate to the sites directory and then use the following command:
$ ln -s /path/to/drupal/sites/old.domainname.com new.domainname.com

Security Concerns


You might want to reconsider using Drupal's multi-site configuration, in situations where the administrators for all of the sites being run from the same code base are not either the same person or a small group with a high level of mutual trust. The reason is that anyone with full administrative privileges on a Drupal site can execute arbitrary PHP code on that site through various means (even without FTP access to the site), and that arbitrary PHP code could be used from one site to affect another site, if the two sites are in the same HTTP document root and sharing the same Drupal code.

So, unless you completely trust all of the administrators of the sites you are considering running from the same Drupal code base to be knowledgeable, careful, and not malicious, you might want to consider installing their Drupal sites in completely separate areas of the web server that are not able to affect each other via PHP scripting.

Share a single database across multiple sites

Drupal supports sharing a database with other web applications with the table prefix, also known as $db_prefix from settings.php.

The table prefix is defined in your Drupal site's settings.php file, and when it is present Drupal will place the prefix before each table name in the database. So if the table prefix were 'mysite_' then Drupal would look for tables named 'mysite_access', 'mysite_actions', and so on (instead of the default tables names 'access', 'actions', etc.) This allows more than one Drupal site, or even Drupal and other products, to share the same database, because the table names will not collide with one another. You can have another Drupal instance with table prefix 'mysite2_' sharing the database with 'mysite_' and indeed many other instances as long as each one has a unique table prefix.

If your hosting company only provides you with one database, then sharing it between multiple Drupal sites with table prefixes can be a cost effective alternative to paying for extra databases!

Here are some more examples of how you might use table prefixes:

  • You set up a main company website, www.example.com, which was a default Drupal install with no table prefix. The following year, you add a second website for intranet.example.com, with table prefix 'intranet_'. Both sites share your example.com database that comes with your hosting company's package.

  • You could have a single database that contained 10 Drupal sites, with table prefixes 'site1_', 'site2_', 'site3_', and so on, up to 'site10_'.

  • You could add a Drupal installation to an existing Wordpress database, by using a table prefix like 'drupal_'. Then your existing Wordpress user table named 'users' would not collide with the Drupal users table named 'drupal_users'.

  • Once you have set up a Table Prefix, it is also possible to share tables between Drupal installations. This can allow you to share taxonomy terms, users, etc. Note: Sharing tables is for advanced users only and may cause problems with your site, including being unable to upgrade it!


How do I install a new Drupal site with a Table Prefix?


Usually, you will have the Drupal installer set your prefix when you are first installing your site.


    1. Proceed through the installation steps until you come to the Set Up Database screen.

    2. Fill in the Database name, Database username, and Database password of your existing database you wish to install into.

    3. Expand the Advanced Options section and add a prefix underneath Table Prefix. You should end your table prefix with an underscore _ so that the table names are more readable in the database.If you are not sure what to use, try the prefix: drupal_. You can only use a prefix once, so for the third site you install you must call it something else, like drupal2_.

    4. Continue the setup as normal


.

Where is the Table Prefix stored and how do I change it?


The Table Prefix for each site is stored in the variable $db_prefix, found in your site'ssettings.php file. In your Drupal codebase this file is often at 'sites/default/settings.php'. Or, it might be at 'sites/example.com/settings.php' if you have a multisite setup with more than one site running.

Once Drupal has been installed, you cannot change the the table prefix! If you must change the prefix or add a new one, you can do so by editing settings.php and manually change the $db_prefix line. Please note that if you change the prefix you must also update the names of all your database tables to start with that prefix!. Otherwise your site will not function, because it will not be able to locate its database tables. You will most likely see the Drupal install page instead of your site if you try and load it without updating the table names.

How do I combine two or more existing sites into one database using Table Prefixes?


To combine two or more existing sites into a single database, you will need to accomplish these steps:

  1. Set up a test database and work from a backup!

  2. rename all the tables in one (or even both) of the databases to start with a prefix. For example, if your prefix was test_, your access table would be renamed to test_access, your users table would be called test_users, and so on, for all of your Drupal tables.

  3. Now combine both sets of tables from the two sites into one database

  4. Set the $db_prefix variable in both sites' settings.php files to match the correct prefix for each site. Our example site with tables named like test1_user would then have the following in its settings.php
    $db_prefix = 'test1_';

  5. Try and load both sites using their prefixes, and verify they are working correctly. You now have a multi-site database!


Upgrading to a new Drupal version


Major Drupal upgrades with a shared database will work without any special steps. Just remember that if you have 3 websites in a database, then having a proper backup and testing everything on a development copy is at least 3 times as important! Never attempt a major upgrade without having a backup of both your database and your PHP codebase, so that you can get back to a working version of your sites if anything goes wrong.

Sharing tables between databases


Once you have multiple sites set up in the same database, it is possible (though not recommended) to share tables between the Drupal sites. By doing so, you may share things like users, taxonomy terms, and content, to name a few.

However, sharing tables comes with some security and upgrade implications, and is for advanced users only. For instructions on table sharing, please see Share tables across instances (not recommended).

Multi-site on Linux

Software installed:


  • Drupal 6

  • Apache 1.3

  • Red Hat 6.1 (Although other distributions will work)

  • PHP5

  • PostgreSQL 7.4


The process:


(You may get more specific explanation in your Linux distribution documentation.https://help.ubuntu.com/community/Drupal
http://wiki.mandriva.com/en/Local_multi-site_installation_of_Drupal
etc.)

  1. Install the Drupal core download from Drupal.org.

  2. Install default Drupal site. I created mine with a "dummyUSER" user and "dummyDB" database with Drupal code in apache/htdocs/drupal

  3. Once you have this working then create a new dir "example1.com" directly under "sites" dir.
    mkdir sites/example1.com
    cp -R sites/default/* sites/example1.com/

  4. Create a new database "example1DB" and new user "example1USER" in database.

  5. Edit the sites/example1.com/settings.php and change the following:

    • $db_url = 'pgsql://dummyUSER:dummyPSSWDl@localhost/dummyDB';
      to $db_url = 'pgsql://example1USER:example1PSSWDl@localhost/example1DB';

    • (this step is optional, normally Drupal will recognise the base url automatically):
      # $base_url = 'http://www.example.com';
      to $base_url = 'http://www.example1.com'; (Remove the '#' [comment])


  6. cp apache/htdocs/drupal/install.php to apache/htdocs/drupal/sites/example1.com/

  7. Point your browser to www.example1.com. Drupal will show you lot of errors.

  8. Once it shows you errors you are all good. Just point your browser towww.example1.com/install.php and it will present you the installation screen. Install from there on.

  9. Repeat the above process for www.example2.com


Note
If it says the site is offline then your database information in settings.php is not correct. If it says site not found then your base url in settings.php is not correct.

Multi-site on Windows


Software


This guide assumes you have installed WAMPServer, which you can download below:

Alternatively, you can install another WAMP package, but you will need to adjust the paths as necessary.

Process


  1. Set up Drupal as usual

    1. Install WampServer (or another 'WAMP' package) and make sure that Apache and MySQL services are running.

    2. open phpMyAdmin in your browser localhost/phpmyadmin (or it can be launched via the WampServer icon in your system tray.)

    3. Create a new database -- we'll call it drupal6 because this will be our base installation which we will leave untouched. While you're here create a second and third database, which we'll call site1 and site2. You can also change the database privileges if you want, but to keep things simple here, we'll stick with the default user root and no password.

    4. Download Drupal 6 into WampServer's wamp/www folder (or the htdocs folder in Xampp and some other packages). (You'll need a tool like 7-zip to unpack the Drupal tar.gz file).

    5. Do your first Drupal installation by pointing your browser to your Drupal folder, which should be something like http://localhost/drupal-6.x. Enter the drupal6 database and user settings (root and no password in this example). Complete the installation, but then leave it alone.


  2. Prepare the files for your new multi-sites

    1. Find Drupal's sites folder, make a copy of the default folder and rename it to the URL you want for your first test site. To keep it simple, we'll make it the same as the first test site database: site1. While you're here, create files, tmp and themes sub-folders within this new folder. The themes sub-folder will be used for any custom theme you create specifically for this site. Similarly, you can create a modules sub-folder for any module you use only with this site. However, generally, I find it easier to keep all contributed modules together in the sites/all/modules folder so I can use them with all my test sites.

    2. Use a text editor to open the settings.php file in your new site1 folder and change$db_url line to reflect your first test site database, and the database user name and password, eg:
      mysql://username:password@localhost/site1
      Also, change the $base_url to the above site URL, eg:
      $base_url = 'http://site1'; // NO trailing slash!

    3. Repeat the above 2 steps for the other test site (site2)


  3. Adjust windows so it can find the new site at a new made-up nameFind the Windows hosts file, which should be in Windows' System32/drivers/etc folder, make a backup of that file and then open the hosts file in a text editor. Here, add new lines mapping your localhost IP address to match the URLs of your test sites and your original Drupal site. In our example, it would look like this:
    127.0.0.1 localhost
    127.0.0.1 site1
    127.0.0.1 site2
    127.0.0.1 drupal6

    This is telling Windows Networking that http://site1/ is a name for this machine.

  4. Adjust Apache so it responds to requests for the new names

    1. Find the Apache httpd.conf file which, in WampServer, should be in thewamp/bin/ApacheX.X/conf folder (where X.X is the Apache version number). Sorry, I can't remember where Xampp installs this, but it will be in the Apache folder. Anyway, all you need to do with this file is make sure the "Virtual hosts" line is active by removing the # before Include conf/extra/httpd-vhosts.conf.

    2. Make a backup of that httpd-vhosts.conf file (which is in Apache's conf/extrafolder), then open httpd-vhosts.conf with a text editor and add these lines:
      <VirtualHost *:80>
      DocumentRoot C:/wamp/www/drupal-6.x
      ServerName site1
      </VirtualHost>

      where C:/wamp/www/drupal-6.x is the path to the Drupal installation folder andsite1 is the URL for your first test site. Add another entry for your other test site, another entry for your original Drupal installation and another entry for WampServer's localhost URL (if you want to keep this active), eg:
      <VirtualHost *:80>
      DocumentRoot C:/wamp/www/drupal-6.x
      ServerName site2
      </VirtualHost>

      <VirtualHost *:80>
      DocumentRoot C:/wamp/www/drupal-6.x
      ServerName drupal6
      </VirtualHost>

      <VirtualHost *:80>
      DocumentRoot C:/wamp/www
      ServerName localhost
      </VirtualHost>

    3. Restart Apache for the changes to take effect. With WampServer, this is done by selecting the WampServer icon in the system tray and then "Restart all services".


  5. Now you're ready to install each Drupal test site using your browser, eg:
    http://site1/install.php
    http://site2/install.php


And that's it. You can access your two test sites anytime WampServer is running by using the http://site1 and http://site1 URLs.

As I said, it's not exactly simple, but it is well worth the effort. Now you can do whatever you like with your test sites. If you mess up with, say, site1, just delete the site1 folder, thesite1 database in phpMyAdmin and the site1 entries in the Windows hosts and Apachehttpd-vhosts.conf files and start again. Alternatively, if a site works out and you want to go live with it, the multi-site approach makes this easier (in my opinion).
One final caveat: I'm no expert. This technique works for me (apart from one corporate environment with a particularly annoying proxy server), but I'd welcome any feedback, especially if there are any accuracies.


Drupal multisite installation

The following pages cover some special installation cases, such as running several Drupal sites from a single code base (also known as multi-site installations) and specifying a database table prefix.

What is a cron job?

Many Drupal modules have tasks that have to take place from time to time. Think of cron as the tolling of a bell, letting Drupal know that it should perform the appropriate tasks.

The actual "cron job" is a time-triggered action that is usually (and most efficiently) performed by your website's hosting server, but can also be configured by a remote service or even from your own desktop.

For your Drupal site, what actually happens is that the cron job triggers an invisible visit to the site's cron.php file (http://www.example.com/cron.php) which, in turn, executes tasks on behalf of installed modules.

Triggering Drupal cron without a cron job


With the inclusion of "Poor man's cron" in the Drupal 7 core, it is no longer necessary to set up a cron job on your web server. Instead, you can configure the frequency with which cron is run on admin/config/system/cron (Administration > Configuration > System > Cron).

In Drupal 6, you can do the same thing by installing the contributed Poormanscron module.

Explain Taxonomy in drupal .

Drupal has a system for classifying content, which is known as taxonomy and implemented in the core Taxonomy module. You can define your own vocabularies (groups of taxonomy terms), and add terms to each vocabulary. Vocabularies can be flat or hierarchical, can allow single or multiple selection, and can also be "free tagging" (meaning that when creating or editing content, you can add new terms on the fly). Each vocabulary can then be attached to one or more content types, and in this way, nodes on your site can be grouped into categories, tagged, or classified in any way you choose.

What is a Module in drupal ?

A module is software (code) that extends Drupal features and/or functionality. Core modules are those included with the main download of Drupal, and you can turn on their functionality without installing additional software. Contributed modules are downloaded from the Modules download section of drupal.org, and installed within your Drupal installation. You can also create your own modules; this requires a thorough understanding of Drupal, PHP programming, and Drupal's module API.

List the SEO modules available in Drupal.

1. Pathauto
2. Nodewords/ Meta tags
3. Service links
4. Google analytics
5. Related Links
6. Search 404
7. Site map
8. Url list

Theme: Which are the files in a typical drupal theme and their purpose

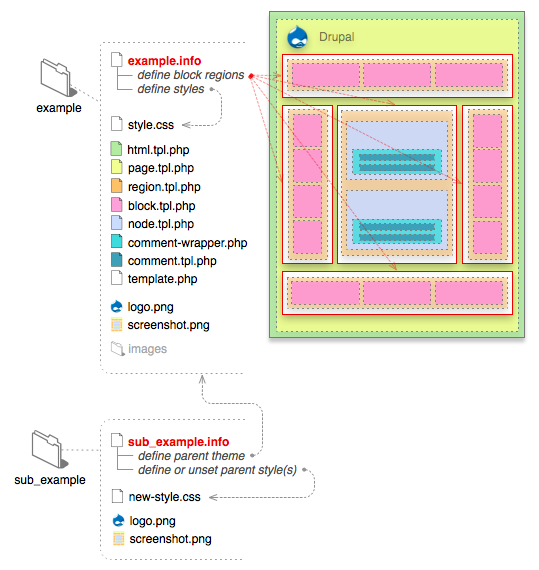
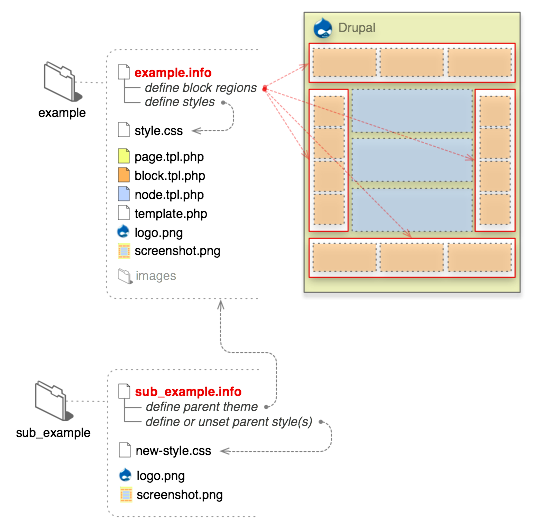
A drupal theme is a collection of files that define the presentation layer. You can also create one or more "sub-themes" or variations on a drupal theme. Only the .info file is required, but most themes and sub-themes will use other files as well. The following diagram illustrates the files that are found in a typical drupal theme and sub-theme.

DRUPAL 6


DRUPAL 7

theming requirements

.info (required)
All that is required for Drupal to see your theme is a ".info" file. Should the theme require them, meta data, style sheets, JavaScripts, block regions and more can be defined here. Everything else is optional in drupal theme.

The internal name of the theme is also derived from this file. For example, if it is named "drop.info", then Drupal will see the name of the theme as "drop". Drupal 5 and below used the name of the enclosing folder of the theme.

Info files for themes are new in Drupal 6. In version 5, .info files were used solely for drupal modules.

template files (.tpl.php)
These drupal templates are used for the (x)HTML markup and PHP variables. In some situations they may output other types of data --xml rss for example. Each .tpl.php file handles the output of a specific themable chunk of data, and in some situations it can handle multiple .tpl.php files through suggestions. They are optional, and if none exists in your drupal theme it will fall back to the default output. Refrain from having complex logic in these files. In most cases, it should be straight (x)HTML tags and PHP variables. A handful of these templates exist in directories where core and contributed modules exist. Copying them to your drupal theme folder will force Drupal to read your version.

Note: The theme registry caches information about the available theming data. You must reset it when adding or removing template files or theme functions from your theme.

template.php
For all the conditional logic and data processing of the output, there is the template.php file. It is not required, but to keep the .tpl.php files tidy it can be used to hold preprocessors for generating variables before they are merged with the markup inside .tpl.php files. Custom functions, overriding theme functions or any other customization of the raw output should also be done here. This file must start with a PHP opening tag "

Sub-themes
On the surface, sub-themes behave just like any other drupal theme. The only differences is that they inherit the resources from their parent themes. To create one, a "base theme" entry inside the .info file is needed. From there it will inherit the resources from its parent theme. There can be multiple levels of inheritance; i.e., a sub-theme can declare another sub-theme as its base. There are no hard set limits to this.

Drupal 5 and below required sub-themes to be in sub-directories of the parent theme. This is no longer the case.

Others


  • The logo and screen shot is not absolutely necessary for the theme to function, but it is recommended, especially if you are contributing your theme to the Drupal repository. Screenshots will show inside the theme administration page and the user account settings for selecting themes when the appropriate permissions are set. See the screenshot guidelines for more information.

  • To supply administrative UI settings or "features" beyond logo, search, mission, etc., a "theme-settings.php" file can be used. This is an advanced feature. More information can be found in the Advanced settings handbook page.

  • For color module support, a "color" directory with a "color.inc" file is needed along with various support files.


  • If you want to base your work on a core theme, use sub-theming or make a copy and rename the theme. Directly modifying Bartik, Garland or Minnelli is strongly discouraged, since they are used for the install and upgrade process.

  • All non-Core or modifications to Core themes should be installed under the "sites/all/themes" directory to keep them separate from core files. If you plan to run multiple sites from a single Drupal code base, you can make a theme available to a specific site rather than all sites; read about how to set this up in Multi-site installations.

Hello world!

Welcome to WordPress.com. After you read this, you should delete and write your own post, with a new title above. Or hit Add New on the left (of the admin dashboard) to start a fresh post.

Here are some suggestions for your first post.

  1. You can find new ideas for what to blog about by reading the Daily Post.

  2. Add PressThis to your browser. It creates a new blog post for you about any interesting  page you read on the web.

  3. Make some changes to this page, and then hit preview on the right. You can always preview any post or edit it before you share it to the world.